Sadly I did not make it to the Phalanx Show in St Helens. I had too much to do trying to sort out moving into my new flat there, and as time was limited something had to give. It was the show.
However I put the money I would have spent at the show to good use on eBay and at a local railway model shops, buying some terrain kits, paints and a few old Warhammer Fantasy figures.
Because I think that bug has bitten again.
I admit to having a Love/Hate relationship with Warhammer. I love painting the figures and I love the rules, and the fun element that is evident in both. But I hate the pricing structure,where you will pay more for a figure's in-game prowess than the figure itself is worth. I mean can you imagine having to pay more for a box of Italeri Tiger tanks than for their box of M4 Shermans? But that's the GW deal and one does not have to buy into that side of the game-system if one does not wish to.
And I hate most of all the gamesmanship that the Army Book system inspires in so many of the players. To their credit, GW have in the past tried to counter this with articles in White Dwarf telling the boys (it always is the boys) to behave and stick to the "spirit" of the game but youthful testosterone and geekiness, coupled with the Army Books, does tend to bring out the worst in the little dears.
So whilst I love the game, I now stick to the core rulebook and don't bother with all the special stuff. Nor do I play against hard-core players.
On other fronts, my 20mm Assyrian Army is almost complete now, and painting should start soon. I am using HaT figures, which I think are a little chunkier and easier to paint than the lovely Caesar ones. I am also hoping to pick up a couple of the Assyrian Rams and Siege Tower kits out there. They are rare as hen's teeth but I have seen a couple and will order them next month. Rules will be Warhammer Ancients.
The 30mm Spencer Smith ACW project is also continuing, with some new purchases planned, and I must also remember to contact John Preece about some old SAE figures we had an interest in. That's on my to-do list, so if John reads this,....
Oh, and there's my Fictional 20mm WW2 project. I got rid of all the old stuff in my massive clear-out, but as soon as I had a decent income, it stared to revive again and I now have a half dozen AFVs and about a hundred soldiers to paint up. I am using the same theme as before, but this time I am being a little less ambitious and will limit myself to small-sized forces. I got too carried away last time and ended with scores of tanks and maybe a thousand figures in the Build and Paint queue, and that is almost a guarantee that the project will never really take off.
The Victorian Steam Punk Battles remains a dream project. Again, it had not got beyond the purchase stage, and 90% of it went in my enforced clear-out.
So work will start again as soon as I move into my new flat next week.
Showing posts with label Fictional Armies. Show all posts
Showing posts with label Fictional Armies. Show all posts
Sunday, 24 June 2012


Sunday, 3 July 2011
Victorian Steam Wars
I am rapidly building up the forces for this game of fictional battles between late 19th centry European nations, and now how enough infantry, cavalry and artillery to make a start on organsing and painting them.
The two resin steam tanks from Ironclad Miniatures have arrived, although I have not yet made them up.
I certainly have enough steam lorries now. I picked up loads on eBay for less than a pound each, which is pretty good value for money. I like using these cheap Ledo and Corgi trucks for my wargames. Admittedly I am not fussy when it comes to getting all the details correct - hence the fictional nature of all my miniatures games - so it matters not to me whether a truck is of the right make and model for a particular foe.
Even when I did historical stuff, I wasn't bothered with "getting it right".For example, here's a Corgi model of what looks like a 1940's lorry. I sprayed it black, then went to work with the acrylic paints, and ended up with a fairly reasonable-looking late war German truck. After all, who's to say the Germans did not use loads of ersatz, comandeered civilian trucks when the need arose?

I intend to do the same with the steam trucks I have bought, although single colour paint schemes will be more appropriate for this era.

This initial batch will mostly be for towing artillery and supplies. I might also invest in a few more and then scratch-build some armour around them, to create some armoured cars/trucks. There are lots of possibilities open to me...
The two resin steam tanks from Ironclad Miniatures have arrived, although I have not yet made them up.
I certainly have enough steam lorries now. I picked up loads on eBay for less than a pound each, which is pretty good value for money. I like using these cheap Ledo and Corgi trucks for my wargames. Admittedly I am not fussy when it comes to getting all the details correct - hence the fictional nature of all my miniatures games - so it matters not to me whether a truck is of the right make and model for a particular foe.
Even when I did historical stuff, I wasn't bothered with "getting it right".For example, here's a Corgi model of what looks like a 1940's lorry. I sprayed it black, then went to work with the acrylic paints, and ended up with a fairly reasonable-looking late war German truck. After all, who's to say the Germans did not use loads of ersatz, comandeered civilian trucks when the need arose?
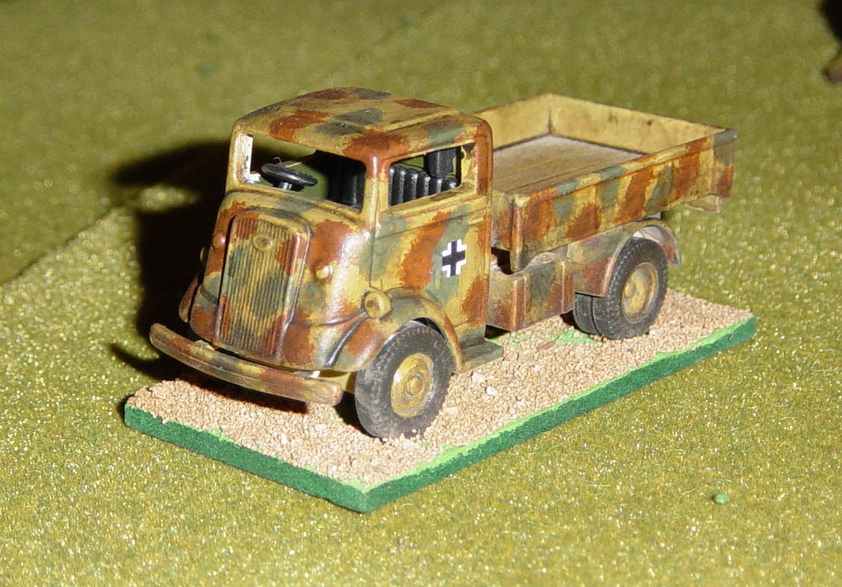
I intend to do the same with the steam trucks I have bought, although single colour paint schemes will be more appropriate for this era.

This initial batch will mostly be for towing artillery and supplies. I might also invest in a few more and then scratch-build some armour around them, to create some armoured cars/trucks. There are lots of possibilities open to me...
Sunday, 19 June 2011
Phalanx
Well, had a wonderful day at Phalanx yesterday. It's the St Helens Spartans show, and I've been for the last two years running. It's a good size gig, and very friendly, so I have enjoyed both trips.
This time I brought along a few bits to the well-organised Bring & Buy, and waved goodbye to my 40mm Fictional Lace Wars project, which went to a grateful guy from Yorkshire called Steve. I also cleared away some painted resin buildings and a few books, so ended up with money in my purse.
Naturally I took advantage of the wares on display, and added a few Italeri tanks to my fictional WWII-era forces; a box of Italian M13/40s and a box of Semoventes.
I also invested in a few reduced-price boxes of Strelets and Emhar figures for my "Steam Wars", which are going to be set in a fictional late Victorian-era Europe, with the usual two main antagonists, Moldovia and Vulgaria. I then picked up a couple of Ironclad Miniatures Steam Tanks which caught my eye, so they should be arriving next week. These will go with the cheap Lledo steam trucks I'm getting from eBay.
With the armies clad in colourful and rather OTT pre-WW1 uniforms, I think the project will look very pretty and I can mix in loads of different figures and uniform styles. For example, so far the cavalry forces of both sides include Boer War Australian Lancers, WW1 German Hussars and Cuirassiers, and Russo-Turkish War Russian Hussars and Dragoons. I might even find a place for a unit of Bengal Lancers in there. British Guardsmen in redcoats bearskins are, of course, de rigueur for Her Majesty Queen Victoria's Imperial Interventionist Force.
I think I am going to have a LOT of fun with this project, and it looks as if it will be even cheaper than the fictional WWII-era one, as long as I don't invest in too many of Ironclad Miniatures' lovely and very tempting little steam tanks.
I think I am going to have a LOT of fun with this project, and it looks as if it will be even cheaper than the fictional WWII-era one, as long as I don't invest in too many of Ironclad Miniatures' lovely and very tempting little steam tanks.
Monday, 9 May 2011
Campaigning Across the Board
Back on the topic of boardgames, I have managed to find one that I can tie into my interest in fictional wargames. I spent a few months searching on eBay until I found one that I thought would suit.
The game, which I had previously owned (but never played) many years ago and had long sold on, was Avalon Hill's Blitzkrieg. It's a fictional wargame between two nations. Great Blue and Big Red. It's fought over a large mapboard and is based on WWII and modern era conflicts. I thought it would be ideal for generating campaign clashes between the Vulgarian and Moldovian forces, as well as possibly allowing for the inclusion of neutrals and allies.

So next month I shall start work on some campaign rules to make it work. Basically the core of the game's rules are fine, and it should be possible to just leave out the combat results for those clashes one wishes to play on the table top. The only real work will be to convert the counters' unit strengths into OOB's for the table top forces.
Another recent acquisition, this time purchased on a whim, was Iron and Fire. It's a cross between a boardgame and a tabletop game, which includes unit counters and card terrain to get one started, somewhat akin to the old Avalon Hill Napoleon's Battles system. The game dates from the mid-'eighties and covers the ACW, specifically the Shenandoah battles of 1862. It was going cheap on eBay and as I have an abiding interest in the ACW, and had some recall of seeing the game advertised way back then, I thought I'd get it.
The game itself is strange. It uses dice-less combat resolution, based on a comparison between opposing units' command, skirmish "superiority", and moral at the time of combat. It's a very odd and not at all intuitive rule system, which I suspect is the reason the games (there were two of them) sank without trace quite quickly. Nevertheless, with my devotion to all things ACW, it was worth a fiver. It should not be too hard to think up some decent rules for it.

Sunday, 8 May 2011
There And Back Again, Again.
Well, it's been a while since I last posted, and a lot of things have happened over the last year, amongst them a divorce, a move from darkest Wales, a new life and a new job.
Sadly, with all of that there has obviously been little time for my hobby, and so things went onto the back burner for a fair bit. However, now I have some free time and a little money to spare I am starting to get back on track, and also making plans for some new periods, mostly fictional, of course.
The WWII-era armies of Moldovia and Vulgaria are proceeding apace, with lots of new and esoteric vehicles added to both sides. I've made up a few dozen kits but as yet have not had the time to start painting again. I've also invested in some of the Valiant Miniatures 20mm figure sets, and look forward to making them up.
The ACW stuff is on hold, as I need to restart painting a couple of regiments for the pesky Rebels.
The home-cast Lace Wars armies are being reassessed, as I really don't have the space or inclination to build those further, so the whole kit and kaboodle might well end up on eBay or at a local wargames club Bring & Buy next month.
The new project I am looking at is a fictional turn of the century encounter between those two inveterate combatants, Moldovia and Vulgaria. The plethora of 20mm plastic figures from the 1870 to 1914 period has led me to dream of a couple of "steam-punk" armies, with colourful uniforms, cavalry, early breach-loaders, Gatling guns, and a mix of horse-drawn and vintage motor transport, along with some of the wackier WWI tanks. I've already invested in some packs of figures from the HaT and Zvezda early-WW1 ranges, and the Strelets Russo-Turkish War sets. Not yet got the armies organised, but the ideas are forming and it looks like fun.
On the board-game side of things, I picked up a copy of GMT's Commands & Colours: Napoleonics a couple of months ago, and have been solo-playing it for a while. It's a great system that builds on their wonderful Ancients rules, and really gives the flavour and fun of the Napoleonic period. I must try and get my old friend John Preece interested. I think it will suit his style of play and sense of fun.
Tuesday, 12 January 2010
When The Going Gets Tough, The Tough Go Shopping!
I popped down to the South East of England over the past weekend, to visit a very good friend of mine who had just had a (successful) major operation in Brighton. As it's such a long way to go, I always tend to make a short holiday of such journeys, and this time was no exception. I spent a few relaxing days with my sister, and apart from a nightmare trip through the blizzard to visit my friend Nicky in the Sussex Nuffield Hospital, I also managed to get in a visit to the large Modelzone shop in Holborn. This is on the site of the old Beatties store (not the old, old Beatties store, which was in a tiny shop just across from the Underground). They had a fair-ish selection of stuff I wanted for my Battle! project. I picked up a box of the new Italeri US Infantry, as the old re-issued ESCI set has no radio operators, and the mortars in the new set are much better.

And after a twenty minute hunt through the rather badly organised shelves of kits, I did eventually find several of the fast-build Italeri M3 Halftracks, and bought three boxes, six vehicles in total. I also checked out the Sale shelves and found two very useful Revell 1/76 Wespes SPG's. These are the old Matchbox kits, re-issued under the Revell label. They are nice little models and easy to build, and as the sale price was £2.99 I bought two of them, which covers my Vulgarian Artillery contingent nicely.
Today I found some spare time between getting the little one into school, the usual housework, shopping, and picking up the kid from school. So I cracked on with slinging a couple of the M3's together. The fit of parts is mostly good, but the one-piece front bulkhead/instrument panel/windscreen needed a little carving to get it to fit inside the front hull. Failure to do so on the first one I built resulted in a small gap 'twixt bonnet and screen. I failed to notice this until the glue had dried, so I left it alone. But the next one was carefully checked for fit and the piece had some plastic trimmed away from the sides to make it sit better against the bonnet top.
I then tried to prime the thing. Now lately I have found this to be a frustrating process. I do wash the sprues before construction, to get rid of any mould release agent that might still be on then. But lately this has not been working. Is there a new agent being widely used? Who knows, but none of the plastic kits I have made so far on this project have liked being undercoated with my usual matt black acrylic. The plastic just seems to repel the paint, as can be seen in this photo of the back door on one of the M3's.

I eventually resorted to an undercoat of black enamel, which worked OK. Most odd.
Anyway, aside from that brief annoyance the project is rolling along nicely. The first three M3's will be painted as Moldovian vehicles, and the second three as Vulgarian, just to keep the forces balanced whilst the project continues.

Tuesday, 5 January 2010
Battling On.
I eventually decided that it was time to break out the painting kit again and push on with the Battle project. I had just started the Moldovian forces before the Christmas break, and so cracked on with the Infantry and a few AFV's.
The Moldovian AFV camo scheme is quite complex. A base coat of GW Catachan Green is applied, and then GW Vermin Brown and Bubonic Brown are rougly stippled in irregular blotches and patterns over the base colour. Once dry, those blotches are then outlined with GW Chaos Black.
Then the two colours are filled in with another coat of each, and then the Catachan Green base coat, and the Chaos Black lines, are tidied up. Finally the tank is weathered by dry-brushing with GW Kommando Khaki, and areas like the engine deck, gun muzzle and exhausts are stained with a thin black/brown ink wash.
The tracks are painted Boltgun Metal, and then stained with the same black/brown ink wash.

Vehicle tyres are painted with Tamiya NATO Black, which is THE best colour for tyres I have ever found. It dries quickly to a VERY matt black/grey, and the effect is very...um... tyre-like.. Is that a word? It is now.
The Moldovian Infantry are the old Esci US Infantry, re-released by Italeri. They are under-coated in black and then base-coated with GW Camo Green. The webbing and gaiters were Cote D'Arms Faded Khaki, the boots were black, and grenades, equipment and helmets were Catachan Green. The uniforms were then given a wash of GW Dark Green Ink. I did have a go dry-brushing a few with Kommando Khaki, but to be honest it made little or no difference to the look of the figure, so I left the rest with just the ink wash and saved myself a hour or so of work.

Incidently, the little Pagasus BA6 Armoured Cars are a delight to build. The fit of parts is perfect; they virtually snap togther, and produce a dinky little model that looks the part.
Saturday, 19 December 2009
More Battle!
I have been rather productive this last month, considering all the other stuff that needs doing around the house in the run-up to Christmas.
The first batch of Vulgarian Infantry is now complete and varnished. Three Vulgarian AFV's and a truck have been completed, as has a Moldovian light tank, and two more Moldovian AFV's, a Panther and a BA-6 armoured car, are on the painting table as we speak.

However, in a day or so the painting table has to be tucked away as the Festive Season approaches. We have a guest coming to stay, a good friend, and she will use this room. I doubt it will be back out for a couple of weeks afterwards, as trips away will limit my free time.

And who knows? After the holiday I might fancy a break from "moderns", and crack on with my old Spencer Smith ACW project, which needs a couple more units finishing off, and some more artillery purchasing for the Rebs.
Monday, 14 December 2009
Battle! On.
Having completed almost half of the Vulgarian Infantry and all but one of the original batch of Vulgarian AFV's, I have started to work on the paint schemes for the Moldovian forces now.

The Russian Green/Catachan Green idea did turn out to be a bit bland, especially on the cute litle Pegasus tanks. I finished the base coats on a Panther and Jaguar, but to be honest I wanted something with a bit more pizazz to it. I had no desire to copy the historical German three-colour scheme, so I cast my mind back further and decided to try something along the lines of an old WW1 tank "splinter camouflage" scheme that I recall seeing a while back, with three colours and thick black outlines around the colour demarcation points. I used GW paints for the scheme; Chaos Black, Catachan Green, Vermin Brown and Bubonic Brown (very close to dark yellow).

I gave it a go on the Pegasus Jaguar and although it is not yet finished, I like the effect. It sort of gives the impression of a "not quite up-to-date" army, and has also opened my mind to the possibility of using the HaT 1/72 WW2 Polish Infantry as the troops for this nation, rather than the Italeri US Infantry I had previously envisaged.

In the background can be seen the first Vulgarian Opel Truck getting its base coat. This is the old Airfx kit. It's handy for the project as it comes with a 75mm AT Gun and crew, but it has drawbacks as a wargames model.
It is, to be honest, a little too fragile for the wargames table. I deliberately left out lots of the smaller parts, such as the cab interior, drive shafts, front mudguard width indicators and driver's door mirrors, in an attempt to make it less vulnerable. But even so, the thinness of some parts has already caused breakages at the painting stage.
Now I am by no means ham-fisted, but I managed to weaken and then break off both front wheels simply by holding the model very gently by them, while applying a base coat. The spindles on the axle are so thin (less than 0.5mm thick) that they barely offer enough strength to hold the weight of the model itself. In the end I cut the axles down, and will have to superglue the wheels directly to the springs in order to get a strong enough joint. This will work; it's not perfect but I'm not worried. I have another one to make up, but I think for the rest of the wheeled transport I shall use the Pegasus quick-build Opel Trucks as far as the Vulgarians are concerned.
Thursday, 10 December 2009
Battle! Project Update.

I've been busy finishing off some figures during the few spare hours I have had recently. I did come to a full stop because, after years of Horse & Musket and Fantasy projects, where the figures were finished with gloss varnish, I found I had no matt varnish to hand.
Or I thought I hadn't. Eventually, after digging through some boxes that had been tucked away for years, I found a small bottle of Humbrol matt varnish. Luckily if had not gone yellow or solidified, but it had separated and the top was solid, and required more muscle power to shift than I could manage. Thankfully a jar opener was purloined from the kitchen, and the top eventually yielded to brute force. I spent a couple of minutes stirring the thick gunk at the bottom of the bottle and eventually I got a good consistent thickness of liquid varnish. I tried it out on the underside of a tank to see if it was still OK, before risking it on a painted figure.
But it was fine so the first batch of finished Vulgarian Infantry got a coat of it and it worked well, with no yellowing. However, I tend not to brush varnish onto AFV's, as it always looks dreadful when I try it. But trying to get a matt varnish spray by mail order is damned hard now, as many companies are loth to post them via RM. Aberystwyth lived up to its reputataion for not having anything beyond the mainstream, and so things had to wait until a trip to Hereford yesterday, where I managed to find a can of Humbrol matt varnish in a model shop.

I now need to move onto transport for the two sides, and sadly it looks like the total budget will have to go over the £100 mark in order to procure the numbers of halftracks and trucks needed. Frontline will certainly be getting an order from me, as their prices are a good match for most of the quick-build halftracks out there. But that will be in the new year, I expect.
For now, I shall crack on and finish the AFV's and infantry I have.
Sunday, 6 December 2009
Battle! Project Proceeds.
Well, in spite of the pre-Xmas housework, and having to run around taking the little one to various parties, Xmas Fairs and Stage School sessions, I have managed to crack on with this simple and inexpensive project.
I have established a set of rules for the project. In order to keep costs down, almost everything will be 20mm plastics, and as available time is also limited, fast-build kits will be used in most cases. I have also set a financial limit (so as to avoid breaking into the house-keeping money) of a maximum of £4 per vehicle and £6 for a box of figures. With this in mind, my initial outlay so far has been around £50 and I should have both sides done, with a good selection of vehicles, for around £100, at which point I shall cease building and start playing.
The first army is from the rather bombastic central European nation of Vulgaria.
The Italeri Germans' transformation into the Vulgarian hordes is coming along nicely. There are a few wasted poses (I do not like prone figures!) and a little flash on some others (easily trimmed), but most are usable and paint up nicely.
The paint scheme for the Vulgarian military is:
Uniforms: Cote D'Arms Russian Brown.
Webbing: Cote D'Arms Faded Khaki.
Boots: GW Snakebite Leather.
Equipment (helmet, entrenching tool handles, grenades, Panzerschrecks, mortars): Cote D'Arms Grey-Green.
A dark GW Flesh Wash is applied over the uniform, boots and webbing, and then when dry, the figure is dry-brushed with GW Kommando Khaki to highlight.
Guns: GW Chaos Black. (Note to wargamers: modern military weapons are NOT shiny bare metal!)
Rifle Furniture: GW Snakebite Leather and GW Flesh Wash.
Vehicles are all Cote D'Arms Grey-Green.
Once dry, they are then dry-brushed with GW Kommando Khaki, and then areas like the engine deck, gun muzzle brake and exhausts are given a thin wash of a brown/black ink to simulate oil and soot.
 .
Wednesday, 2 December 2009
Odds & Sods.

My first attempt at fictional Horse & Musket armies.
I am always driven by a need to keep costs down to a minimum, so the initial attempt involved some 20mm plastic figures. These are from Italeri, although the figures at the back are, so I seem to recall John Preece informing me, VERY early MiniFigs.

I was intending to use DBN rules for this project, hence the basing. But in the end I just fell in love with Holger Ericsson figures, and nothing else would do...
I very rarely buy figures just for the sake of painting them, but these next ones I did. Picked up for a song on eBay, there were about 25 in the box, all unpainted castings, of which this is a small sample. Renegade I think, and so wonderful to paint! They now reside in the USA, as a buyer there took them off my hands for a fair sum.

And finally, another aborted project; a Punic Wars Republican Roman Army, for DBM. These are the Psiloi for that army. I did a few Blade units too, but ran out of enthusiasm. Figures are HaT. Not a great paint job, but I never really go overboard on plastics, even though I do love them....

Sunday, 29 November 2009
Battle! Project.
Today I started my 20mm Battle! project.
Inspired by Charles Grant's wonderful little book on WW2-era wargaming, I have long desired to create a couple of fictional armies for that era.
Now the history and politics of the actual conflict itself are of little interest to me, and I have always had a hearty dislike of the "wall-to-wall Tiger tank" German armies one so often sees out there, and the all-too-common sets of WW2 rules that cater for them.
However, I do have an interest in the tactical problems posed by mechanised warfare, and a soft spot for many of the vehicles in use at the time. Some of them look really cute.
In order to cater for my interests, and do away with the bias so often inherent in "historical" games of WW2, I have basically come up with two fictious sides; Green and Brown. Both sides will field a happy mixture of whatever tanks, vehicles and weapons I feel like issuing them with.
The figures to be used have been selected purely on the grounds that the sets contain the requisite poses for the units I wish to create, and are available locally and cheaply.
In this case the troops will be Italeri's WW2 German Infantry (re-issue of the old ESCI set) and German Elite Infantry (the new-ish release), and their US Infantry (another re-issue of the old ESCI set). A couple of boxes of each will allow me to complete a battalion of Infantry and their support, using Charles Grant's OOB guidelines. The "German" figures will have brown uniforms, and the "US" figures green.
Support weapons such as Anti-Tank guns will also be provided by Italeri and Airfix. Armoured cars will be by Pegasus (the BA-6), Airfix and Revell (the old Matchbox Puma). Transport will be the new quick-build M3 halftracks, and perhaps later the 251 when it finally becomes available from HaT, plus Opel and GM trucks trucks from Pegasus.
Tanks will be whatever I fancy, really. Neither side will have unbeatable tanks, and Tigers, Panthers, Shermans, Mk IIIs, BT-7s, T34s and Stalins will be available to both sides. I'm using the various quick-build and E-Z build series out there from the likes of HaT, Italeri and Pegasus, and will include the latter's tidy little "what-if" models, too. I even intend to have a brace or so of the old FT-17's from HaT.
In fact today I slung together a couple of the Pegasus late-WW2 "what-if" tanks. They took me about 15 minutes per tank. The main parts such as the hull and turret went together so well they did not even need glue, and the finished kits are pretty little things, that have already set my imagination awhirl with the prospect of designing paint schemes for them.

I have no intention of creating a game that allows wall-to-wall tanks. They will be issued as support, and almost certainly be limited to three or four on a side, in any one battle.
Monday, 23 November 2009
Taking A Rest
This last few days have seen me take a rest from pouring molten white metal into rubber moulds. One needs to back off now and again or else the smell starts to permeate the house. Not too sure it does my lungs much good either.
But really all I have left to do now is the rank and file, and I already have around 80 of those done. The rest can wait, perhaps until after Christmas and the New Year.
In the meantime I have been enjoying watching our little one learn to tie her own shoelaces, a task which has resulted in many tears and angry tantrums on her part.
I've also been reading Charles Grant's The Battle of Fontenoy, which as Jean-Louis pointed out in a comment earlier, is the natural follow-up to The War Game. Let down only by a lack of photos, it is nevertheless an excellent book and great fun to read.
Other than the normal household routine, and getting soaked taking the little one to her Stage School on Saturday, I have been cleaning and undercoating a few 30mm Spencer Smith and SAE metal figures, and basing some of the plastic Spencer Smith Rebels that John Preece kindly swapped me a few weeks ago. I have managed to mislay my usual green basing paint somewhere, so they remain unfinished.
Thursday, 19 November 2009
Artillery
Another few hours free today, between the housework and getting the child to and from school... So naturally I broke out the casting tools and metal and had another bash.
After the success with the cavalry command the other day, mostly due to the new heavy duty elastic bands, I thought it might be worthwhile to have one last crack at the Artillery crews. I am glad I did because I was able to save myself a lot of money. I had given up and was going to purchase four guns and crews from Irregular Miniatures, who do a nice range of 42mm Marlburians that seem to go quite well with these PA Home-casts. But at £7.50 a shot, that was going to be expensive and was a last resort. I already had eight PA guns cast up. It was only the problems with several of the crew moulds that looked like forcing me along the purchasing route.
But today my sense of optimism was borne out, and I managed to get a very high success rate from all the moulds. I did reduce the crew size a little, from six to five, to leave out the most problematic figure. I also decided that four guns was perhaps too many for the force sizes likely to be on the table, so dropped the total guns to three per side.

I have also decided to drop the total number of Cavalry squadrons from three to two per side, and am toying with the idea of dropping the Infantry regiments from four to three. Grenadier regiments will stay at two and I shall increase the Light Infantry contingent by one regiment, for a total of two per side.
I have certainly decided to drop the Foot regiment size from 25 to 21, including the Colonel.
Overall the changes won't really make much difference to the number of castings I have to produce.

And finally, I managed to find an interesting little gem on eBay the other week; The Battle of Fontenoy, by Charles Grant. It was one of a series of books written to provide background on battles for wargamers and modellors. It dates from around 1975, and I look forward to starting it tonight in bed, with a cup of hot chocolate by my side.
Monday, 16 November 2009
By Popular Demand
These castings represent almost all the command figures for both armies. There are another ten foot command figures already fully painted (see past pictures), but the ones here include some part-painted ones now on my work table.
The photo below shows the mounted command figures. The officer pointing with sword will be used mainly for the Cavalry, but I might exchange him, in a couple of squadrons, for the officer type at the bottom; a more sedate pose. That pose will generally be used for the Infantry regiment Colonels. There's a couple of spares of each pose, in case of future breakages.

The Infantry command figures also include an excess of castings, again for possible breakages. I finally managed to get some reasonable castings of the officer advancing with raised sword. Granted I had to clamp the mould loosely, and thus got some flash, but it's easily trimmed away and the figures themselves are now whole. The last time I tried this mould, every figure it produced was sans sword and left hand...!
The four figures at bottom right are Artillery officers. I had actually forgotten I had done these, and will use them as dismounted battery officers, two per army.

Finally, the casting plugs and sprues from the command figures were dumped back in the ladle and used to cast more rank and file.
By the way, all the moulds for the above figures, plus one for an advancing Grenadier and the three Artillery crew moulds, are now listed up on ebay. So if anyone is interested, email me and I'll send you a link...
Casting Couch
I am now resting.... My lungs feel a little odd, as does my head. This AM I spent over three hours having a serious casting blitz, in order to get all of the command figures (along with a couple of spares) for both armies sorted.
And I did it.
It was perhaps the best day's work I've done so far on this project. I cast around 70 figures, 50 of them mounted, and had a success rate of over 90%. Even the tricky Standard Bearers worked fine. The trick was a couple of new heavy duty elastic bands, which the cavalry moulds seemed to respond to. With the bottom of the mould clamped, and the elastic band holding the top firmly but not TOO tight, the resulting castings proved fine. A little flash, granted, but all of them filled perfectly time after time. The only castings to go back in the pot were one where I knocked over the mould before it had set, and two more where the ridges were a shade too prominent.
So really, that is all the hard work done. I now have all the command figures cast for ALL units save the Artillery, which I will be sourcing from the fast and friendly Irregular Miniatures at a later date. so no more mucking around consulting notes for each mould's casting idiosyncracies. The rank and file consist of just two moulds, Foot and Grenadier, both Marching with Shouldered Arms. Now it becomes a simple production line. Boring but quick....
I didn't bother with photos this time. Once you've seen one casting, ...etc etc...
Saturday, 14 November 2009
Casting The Cavalry.
And some mounted officers, of course.
The Standard Bearers are usually some of the hardest figures to cast from the PA moulds, so I regard myself well ahead of the game if I can get more than 40% of them through my QA rules in a single casting session.
The other issue with all the mounted figures is that with some it's often hard to keep the two halves of the larger moulds totally aligned, and so it's not uncommon for a small ridge around the odd figure, which I can usually live with. It's often quicker to file it away than try for a better casting. If it's really bad, then it'll go back in the pot.
These are from the PA moulds, with casting plugs clipped off, but not yet cleaned up. Again, they retain the classic Holger Ericsson look.


Here, the officer pointing with sword (below) ended back in the scrap pile. One doesn't have to look too hard to see the prominent ridges, especially on the arm and sword. The front legs of the horse were very bad too. At first glance I thought it would be OK, but as I was setting it up for shots, I eventually decided it was outside of my QA rules.


With the Standard Bearer I usually have to let a little flash creep in (loose clamps) in order to get the whole thing filled. It also has a strong tendency for the mould halves to slide during clamping, and the failure rate for this mould is very high, often reaching 70% on a bad day.


Thursday, 5 November 2009
Iconic Holger Ericsson Poses.
Although I do have a couple of other poses for Foot and Grenadiers, these two types will make up around 90% of the Infantry.

These castings are not yet cleaned up, but one can get a good idea of the sparsity of detail on them...


These castings are not yet cleaned up, but one can get a good idea of the sparsity of detail on them...

The Joys & Pitfalls Of Home Casting.
Finally I managed to clear the decks enough to crack on with some casting.

Now home-casting with Prince August moulds is not that hard, but it's dangerous if one is stupid, and on top of that one really has to understand the different moulds and what works best for each, if one doesn't want to waste a lot of time.

Some moulds want to be clamped tight. Others want a looser clamp, possibly with a stout elastic band or two around the boards. Some moulds want the clamps to be placed just so. With others you need to allow a bit of flash to creep in, if you want it to fill properly. Some others might need venting, and I use a Dremel with a very tiny bit, to make a hole through the hot mould at the end of the extremity that is refusing to fill.
I actually have fairly extensive notes concerning each of the moulds and how they like to be clamped. If I didn't, I would never remember the details and it would be a matter of trial and error until I could get it right again, which is not ideal.

Even so, there're some sessions when moulds which have worked fine suddenly refuse to play and leave a foot or a leg or a head or a rifle missing. Sometimes I get a 100% failure rate on a mould, days after knocking out a 24 strong unit from it with no hitches at all. Hard to know what causes it. Mainly I think it's the metal; it's not the purest quality.
This is what happened today with one of the Officer Advancing, "round" moulds. I got two useable castings, and another 12 that went back into the pot. That's far too high so I gave up on that one. My guess is a vent has got blocked, but without the drill (now packed) I had to leave it.
The Artillery crews also presented their usual headaches. Now, in spite of ventng and experimenting with different combinations of clamp positions, these crewmen figures have always been a major pain for me, with a far too high fail rate. These moulds are the later ones, the "rounds" made to replace Holger Ericsson's ageing original wood-carved master moulds.
Odd that PA warns people that the new "rounds" are easier to cast than the early original semi-flat moulds, which they claim need a lot of work to cast a good figure. My experience, after casting a fair few figures from both new and early moulds, is that the opposite is true. The newer figures require more venting, are more sensitive to clamping issues, produce a MUCH higher rate of duds, and the castings need more cleaning up, than the early semi-flat ones.
It's for this reason that most of my moulds are now the early semi-flats.
But the Artillery, being problematic, needs a decision. I can stuggle through and spend the rest of my lfe casting them up, or I can give up on using the moulds for the artillery, and just fork out for some Irregular Miniatures 42mm Malburian Guns with crews. Much less work, and they are nice figures and won't stand out too much from the rest of the army. As I have also decided to use Irregular's 42mm figures for the Generals on both sides, I feel happy with this idea.

Today I concentrated on command figures. This makes sense, as I know how many I need (and a few for spares), and as I have no intention of building the armies further after reaching the OOB already outlined, I can sell on the moulds once I have finished.
I also knocked out a unit of Light Infantry (still minus a bugler), and did a few test castings of the Grenadier, Marching, Shouldered Arms. Not bad. Only one dud went back into the pot. One figure came out with the bayonet missing, but that's inside my Back-In-The-Pot guidelines, which basically states that only major faults will be re-cast, and a missing bayonet does not come under that heading. Missing head, yes, missing foot, indeed... but the odd short scabbard, sword or bayonet are fine.
So not a bad couple of hours work. A failure rate of around 20% was acceptable....
Subscribe to:
Posts (Atom)